Saturday, October 28, 2017

How to reuse function in laravel inside different controller (PHP TRAITS)


Hi guys, I'm back! :D

There a time where we need to use the same function in different controller. To
achieve this, we can use trait.

What is trait? well it like a class but you don't have to initiate it while using it.
Refer here. PHP Traits

So how should we start? refer super easy steps below.


1) Create you Traits Folder. (You can put it anywhere you want but I will store it inside my app folder).

app/Http/Traits  (This is Laravel Folder Structure)


2) Next, you create a file inside the folder. For example I had already created HashPassword.php


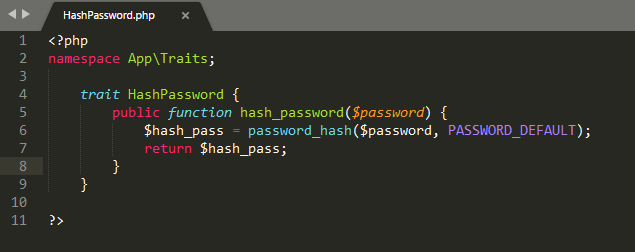
Make sure that you input the namespace so that your controller can detect your trait.

3) Next, Inside your Controller  (For example mine is LoginController)

Just insert the code that I circle and you should be able to use the function inside your trait file. (Change the code according to your needs)


Thanks for the support guys! It is the first time where my blog able to reach 2k+ view in just 1 week.

Support me by follow me on google+ or follow my facebook page for more easy tutorial! :)

Thursday, September 28, 2017

Solved "openssl config failed: error:02001003:system library:fopen:No such process" for Nodejs Window 10


If you get this kind of error after installed nodejs in window 10, it means that your ssl is not pointed  correctly.

So you have to point to the correct path.

1) echo %OPENSSL_CONF% (See your openssl path)
2) set OPENSSL_CONF=C:\OpenSSL\bin\openssl.cnf (Set your openssl path)

After that try and type npm -v again in cmd. You should be able to proceed without error.


Thanks for watching my blog. Do follow me on google+ or like my facebook page for more! :)

Monday, September 11, 2017

Redirect http to https in laravel


Redirect http to https in laravel is easy, all you have to do is just create a
middleware and attach it to your route.

1. Create a middleware.

namespace MyApp\Http\Middleware;

use Closure;

class HttpsProtocol {

   public function handle($request, Closure $next)
   {
           if (!$request->secure() && env('APP_ENV') === 'prod') {
               return redirect()->secure($request->getRequestUri());
           }

           return $next($request);
   }
}

2. Register your middleware in kernel.php

'https_protocol' => \App\Http\Middleware\MiddlewareClassName::class
Note that the namespace path is depends where you store your middleware.
Change it according to where you save your middleware

3. Attach your middleware to your route.

Route::get('profile', 'UserController@show')->middleware('https_protocol');

4. Done. :)

You should be redirecting to https the moment you accessing to http.

Thanks for watching my blog. Do follow me on google+ or like my facebook page for more! :)

Sunday, July 23, 2017

Disable csrf for specific route for Laravel


Hi guys, this tutorial will teach you guys on how to disable csrf for specific Route in laravel.

All you have to do is go to your VerifyCsrfToken Class (It usually located in the middleware folder) and add the route that you want to disable the csrf.

<?php

namespace App\Http\Middleware;

use Illuminate\Foundation\Http\Middleware\VerifyCsrfToken as BaseVerifier;

class VerifyCsrfToken extends BaseVerifier
{
    /**
     * The URIs that should be excluded from CSRF verification.
     *
     * @var array
     */
    protected $except = [
        'stripe/*', // Insert your route here!
    ];
}

Reference
Disable Csrf


Thanks for watching my blog. Do follow me on google+ or like my facebook page for more! :)
Obstrum Facebook Page

Sunday, June 25, 2017

Enlarge Image when hover using css with LIVE EXAMPLE!


This is a simple image enlargement using css. Do click on the link for example in jsfiddle.

Live Example

Thanks for watching my blog. Do follow me on google+ or like my facebook page for more! :)
Obstrum Facebook Page

Tuesday, May 30, 2017

Question that you need to have the answer before proceed to improve mysql database performance.


Optimizing at the Database Level

The most important factor in making a database application fast is its basic design:
  • Are the tables structured properly? 
  • Do the columns have the right data types 
  • Does each table have the appropriate columns for the type of work? 
  • For example, applications that perform frequent updates often have many tables with few columns, while applications that analyze large amounts of data often have few tables with many columns.
  • Are the right indexes in place to make queries efficient?
  • Are you using the appropriate storage engine for each table, and taking advantage of the strengths and features of each storage engine you use? In particular, the choice of a transactional storage engine such as InnoDB or a nontransactional one such as MyISAM can be very important for performance and scalability.
  • Does each table use an appropriate row format? This choice also depends on the storage engine used for the table. In particular, compressed tables use less disk space and so require less disk I/O to read and write the data. Compression is available for all kinds of workloads with InnoDB tables, and for read-only MyISAM tables.
  • Does the application use an appropriate locking strategy? For example, by allowing shared access when possible so that database operations can run concurrently, and requesting exclusive access when appropriate so that critical operations get top priority. Again, the choice of storage engine is significant. The InnoDB storage engine handles most locking issues without involvement from you, allowing for better concurrency in the database and reducing the amount of experimentation and tuning for your code.
  • Are all memory areas used for caching sized correctly? That is, large enough to hold frequently accessed data, but not so large that they overload physical memory and cause paging. The main memory areas to configure are the InnoDB buffer pool, the MyISAM key cache, and the MySQL query cache. 

Optimizing at the Hardware Level

Any database application eventually hits hardware limits as the database becomes more and more busy. A DBA must evaluate whether it is possible to tune the application or reconfigure the server to avoid these bottlenecks, or whether more hardware resources are required. System bottlenecks typically arise from these sources:
  • Disk seeks. It takes time for the disk to find a piece of data. With modern disks, the mean time for this is usually lower than 10ms, so we can in theory do about 100 seeks a second. This time improves slowly with new disks and is very hard to optimize for a single table. The way to optimize seek time is to distribute the data onto more than one disk.
  • Disk reading and writing. When the disk is at the correct position, we need to read or write the data. With modern disks, one disk delivers at least 10–20MB/s throughput. This is easier to optimize than seeks because you can read in parallel from multiple disks.
  • CPU cycles. When the data is in main memory, we must process it to get our result. Having large tables compared to the amount of memory is the most common limiting factor. But with small tables, speed is usually not the problem.
  • Memory bandwidth. When the CPU needs more data than can fit in the CPU cache, main memory bandwidth becomes a bottleneck. This is an uncommon bottleneck for most systems, but one to be aware of.

Thanks for watching my blog. Do follow me on google+ or like my facebook page for more! :)
Obstrum Facebook Page

Wednesday, May 24, 2017

How to create release in git in SourceTree (Window) (Mac)


1. First of all, make sure that `master` branch and `develop` branch in the same branch. (All you have to do is just merge the develop into the master and it will be in the same level)

(If no `master` brunch just double click the `remote/master` branch to create a local branch OR
 follow the link to put the master here)

2. Now make sure that you in `master` branch.
3. Click Git Flow in the GUI.
4. Click `Create New Release`
5. Enter release name. For example: 0.6.2.0 and click OK. (A new branch is created.)
6. You should see uncommited changes. Commit the Changes.
7. Click `Git Flow` again to complete the release
8. DONE :)


Thanks for watching my blog. Do follow me on google+ or like my facebook page for more! :)
Obstrum Facebook Page